How to Install Kali Linux in Termux Using Proot Distro [Step-by-Step Guide]

How to Install Kali Linux in Termux Using Proot Distro [Step-by-Step Guide]

Interested in installing Kali Linux in Termux using the Proot Distro method? Follow this comprehensive tutorial:

Step 1: Update and Install Dependencies

To ensure a smooth installation process, begin by updating and installing the necessary dependencies in Termux:

    pkg update && pkg upgrade -y
  • pkg update && pkg upgrade -y : Updates the package list and upgrades all installed packages to the latest version.

  • pkg install x11-repo
  • pkg install x11-repo : Installs the x11-repo package repository, necessary for graphical packages like the XFCE desktop environment.

  • pkg install termux-x11-nightly pulseaudio proot-distro wget git nano -y
  • pkg install termux-x11-nightly pulseaudio proot-distro wget git nano -y: Installs additional packages essential for running GUI applications and setting up Kali Linux in Termux.

Step 2: Install Debian and Set Up Kali Linux

Follow these steps to install Debian and configure Kali Linux:

  1. Install Debian:
  2. proot-distro install debian
  3. Login to the Debian environment:
  4. proot-distro login debian
  5. Update Debian and install necessary packages:
  6. apt update -y && apt install sudo nano gnupg adduser -y
  7. Add a new user named "kali":
  8. adduser kali

    Follow the prompts to set up a password and additional user details.
    Full Name :
    Room Number :
    Work Phone
    Other :

    Press (y) to confirm user details

  9. Edit the sudoers file to grant sudo access to the user "kali":
  10. visudo

    Add the following line to the file after root ALL=(ALL:ALL) ALL: Hit enter and Paste this command

    kali    ALL=(ALL:ALL) ALL

    Save the changes by Ctrl + O , Hit Enter , Ctrl +X it will exit the editor.

  11. Exit from the current user:
  12. exit
  13. Login to the Debian environment as the user "kali" with a shared temporary directory:
  14. proot-distro login debian --user kali --shared-tmp

Once completed, Debian and Kali Linux should be successfully set up in Termux.

Adding Kali Linux Repositories

After executing the provided commands, add the Kali Linux repositories to the sources.list file:

nano /etc/apt/sources.list

Add the following lines to the end of the file:


deb http://http.kali.org/kali kali-rolling main contrib non-free non-free-firmware
deb http://http.kali.org/kali kali-last-snapshot main contrib non-free non-free-firmware

Save the changes by Ctrl + O , Hit Enter , Ctrl +X it will exit the editor.

If you encounter any errors, import the GPG key for the Kali Linux repositories:


gpg --keyserver pgpkeys.mit.edu --recv-key ED444FF07D8D0BF6
gpg -a --export ED444FF07D8D0BF6 | sudo apt-key add -

You need to Enter Password that you made in starting while creating user "kali"

if you still getting error try this code and replace error key with yours

sudo apt-key adv --keyserver hkp://keys.gnupg.net --recv-keys ED444FF07D8D0BF6

After importing the key, update the package list and install the XFCE desktop environment by running the following commands:


sudo apt update -y

Installing Different Desktop Environments on Kali Linux

Choose your preferred desktop environment:

  1. GNOME Desktop Environment:
    sudo apt install kali-desktop-gnome -y

    This command installs the GNOME desktop environment on Kali Linux.

  2. XFCE4 Desktop Environment:
    sudo apt install kali-desktop-xfce -y

    This command installs the GNOME desktop environment on Kali Linux.

  3. LXDE Desktop Environment:
    sudo apt install kali-desktop-lxde -y

    This command installs the LXDE desktop environment on Kali Linux.

  4. KDE Plasma Desktop Environment:
    sudo apt install kali-desktop-kde -y

    This command installs the KDE Plasma desktop environment on Kali Linux.

Once the installation is complete, you can exit the current user session by running the exit command.

exit

Next, you need to set up the XFCE desktop environment.

Launching Different Desktop Environments on Kali Linux for Termux

To create a shortcut command for starting the XFCE desktop environment, create kex file using the nano editor:
nano /usr/bin/kex

Now select the code according your Desktop Environment installed previouusly

  1. This script launches the GNOME desktop environment in Termux.
    
    #!/data/data/com.termux/files/usr/bin/bash
    
    # Kill open X11 processes
    kill -9 $(pgrep -f "termux.x11") 2>/dev/null
    
    # Enable PulseAudio over Network
    pulseaudio --start --load="module-native-protocol-tcp auth-ip-acl=127.0.0.1 auth-anonymous=1" --exit-idle-time=-1
    
    # Prepare termux-x11 session
    export XDG_RUNTIME_DIR=${TMPDIR}
    termux-x11 :0 >/dev/null &
    
    # Wait a bit until termux-x11 gets started.
    sleep 3
    
    # Launch Termux X11 main activity
    am start --user 0 -n com.termux.x11/com.termux.x11.MainActivity > /dev/null 2>&1
    sleep 1
    
    # Login in PRoot Environment. Do some initialization for PulseAudio, /tmp directory
    # and run GNOME as user kali.
    # See also: https://github.com/termux/proot-distro
    # Argument -- acts as terminator of proot-distro login options processing.
    # All arguments behind it would not be treated as options of PRoot Distro.
    proot-distro login debian --shared-tmp -- /bin/bash -c  'export PULSE_SERVER=127.0.0.1 && export XDG_RUNTIME_DIR=${TMPDIR} && sudo service dbus start && su - kali -c "env DISPLAY=:0 gnome-shell --x11"'
    
    exit 0
    

    This script launches the GNOME desktop environment in Termux. Make sure to run it in a Termux environment with necessary permissions.

  2. This script launches the XFCE desktop environment in Termux.
    
    #!/data/data/com.termux/files/usr/bin/bash
    
    # Kill open X11 processes
    kill -9 $(pgrep -f "termux.x11") 2>/dev/null
    
    # Enable PulseAudio over Network
    pulseaudio --start --load="module-native-protocol-tcp auth-ip-acl=127.0.0.1 auth-anonymous=1" --exit-idle-time=-1
    
    # Prepare termux-x11 session
    export XDG_RUNTIME_DIR=${TMPDIR}
    termux-x11 :0 >/dev/null &
    
    # Wait a bit until termux-x11 gets started.
    sleep 3
    
    # Launch Termux X11 main activity
    am start --user 0 -n com.termux.x11/com.termux.x11.MainActivity > /dev/null 2>&1
    sleep 1
    
    # Login in PRoot Environment. Do some initialization for PulseAustrongio, /tmp directory
    # and run XFCE4 as user kali.
    # See also: https://github.com/termux/proot-distro
    # Argument -- acts as terminator of proot-distro login options processing.
    # All arguments behind it would not be treated as options of PRoot Distro.
    proot-distro login debian --shared-tmp -- /bin/bash -c  'export PULSE_SERVER=127.0.0.1 && export XDG_RUNTIME_DIR=${TMPDIR} && su - kali -c "env DISPLAY=:0 startxfce4"'
    
    exit 0
    

    This script launches the XFCE desktop environment in Termux. Make sure to run it in a Termux environment with necessary permissions.

  3. This script launches the LXDE desktop environment in Termux.
    
    #!/data/data/com.termux/files/usr/bin/bash
    
    # Kill open X11 processes
    kill -9 $(pgrep -f "termux.x11") 2>/dev/null
    
    # Enable PulseAudio over Network
    pulseaudio --start --load="module-native-protocol-tcp auth-ip-acl=127.0.0.1 auth-anonymous=1" --exit-idle-time=-1
    
    # Prepare termux-x11 session
    export XDG_RUNTIME_DIR=${TMPDIR}
    termux-x11 :0 >/dev/null &
    
    # Wait a bit until termux-x11 gets started.
    sleep 3
    
    # Launch Termux X11 main activity
    am start --user 0 -n com.termux.x11/com.termux.x11.MainActivity > /dev/null 2>&1
    sleep 1
    
    # Login in PRoot Environment. Do some initialization for PulseAudio, /tmp directory
    # and run LXDE as user kali.
    # See also: https://github.com/termux/proot-distro
    # Argument -- acts as terminator of proot-distro login options processing.
    # All arguments behind it would not be treated as options of PRoot Distro.
    proot-distro login debian --shared-tmp -- /bin/bash -c  'export PULSE_SERVER=127.0.0.1 && export XDG_RUNTIME_DIR=${TMPDIR} && su - kali -c "env DISPLAY=:0 startlxde"'
    
    exit 0
    

    This script launches the LXDE desktop environment in Termux. Make sure to run it in a Termux environment with necessary permissions.

  4. This script launches the KDE Plasma desktop environment in Termux.
    #!/data/data/com.termux/files/usr/bin/bash
    
    # Kill open X11 processes
    kill -9 $(pgrep -f "termux.x11") 2>/dev/null
    
    # Enable PulseAudio over Network
    pulseaudio --start --load="module-native-protocol-tcp auth-ip-acl=127.0.0.1 auth-anonymous=1" --exit-idle-time=-1
    
    # Prepare termux-x11 session
    export XDG_RUNTIME_DIR=${TMPDIR}
    termux-x11 :0 >/dev/null &
    
    # Wait a bit until termux-x11 gets started.
    sleep 3
    
    # Launch Termux X11 main activity
    am start --user 0 -n com.termux.x11/com.termux.x11.MainActivity > /dev/null 2>&1
    sleep 1
    
    # Login in PRoot Environment. Do some initialization for PulseAudio, /tmp directory
    # and run KDE as user kali.
    # See also: https://github.com/termux/proot-distro
    # Argument -- acts as terminator of proot-distro login options processing.
    # All arguments behind it would not be treated as options of PRoot Distro.
    proot-distro login debian --shared-tmp -- /bin/bash -c  'export PULSE_SERVER=127.0.0.1 && export XDG_RUNTIME_DIR=${TMPDIR} && su - kali -c "env DISPLAY=:0 startplasma-x11"'
    
    exit 0
    

    This script launches the KDE Plasma desktop environment in Termux. Make sure to run it in a Termux environment with necessary permissions.

Save the changes by pressing Ctrl+O, hit enter, and then press Ctrl+X to exit the nano editor.

Make the kex file executable by running the following command:

chmod +x /usr/bin/kex

Before running Termux in GUI mode, you need to install the Termux-x11 APK from the official GitHub Releases.

You can download the Termux x11 Universal APK here.

After successfully installing it, you can run the following command to start GUI mode:

kex

Note: You can customize the command as per your preference. For example, you can replace 'kex' with 'guimode'. Ensure there are no existing files with the same name.

To terminate the Desktop environment, create a shortcut command such as 'kill11' to kill the Termux x11 Desktop environment:

nano /usr/bin/kill11

Enter the following code inside the file:


# Kill open X11 processes
kill -9 $(pgrep -f "termux.x11") 2>/dev/null

Save the changes and make the file executable by running:

chmod +x /usr/bin/kill11

Now you can terminate the Termux x11 Desktop environment session by typing 'kill11' in a new tab of Termux.

Termux x11 functions as an X server, offering faster performance compared to VNC which consumes more data.

If you found this method helpful, consider liking our related YouTube video. Thank you for reading! We hope you successfully install Kali Linux on your Termux.

How to use Github as CDN Easy method

How to use Github as CDN Easy method

how to use github as cdn with help of jsdelivr and statically.io

In this article, I will tell you What is a CDN? and How to use it in GitHub Repository.


What is a CDN?


CDN stands for Content Delivery Network, AS its name suggests, it forms a network to deliver the content. With the help of CDN, users can access hosted files and download files faster. To using Github repository and use it to host files and makes files easily accessible without any server issue. Developers and programmers use the CDN method to host their CSS, javascript, HTML, and Others files.


What are the Requirements?


If you want to be a developer then you must have a GitHub account. If you already have you can skip this part.

To use Github As a Content Delivery Network you should create first a Github account if you don't have any it's not necessary but using your own Github repository you can customize your files according to your need. Click Here to Create GitHub Account. After it, you have to create a new repository or you can import. Click here to create a new repository.


Creating github repository will help you to save your

  1. Repository name:- you can write a project name you want to use for your Github repository to use it as a CDN.

  2. Description (optional):- Write about your project what is about its optional but you can write it to help other developers to understand what is your project about.

  3. You Can Keep the repository Public or private according to your needs.

  4. you can select Add a README file if you want to provide a full description of it, You can Select any License according to your project.

  5. after it Click [ create repository ].


github repository create a new file or uploading an existing file option

There is a Two option; creating a new file or uploading an existing file. if you want to write live on GitHub code editor you can create files with names and write code in Code editor.I will suggest uploading your saved files it will save you time.


GitHub Repository choose and upload

Best CDN Websites For GitHub Repository


After Uploading the File you have to find the best CDN website there are many other CDN websites available but for the best experience, developers use these two websites.

  1. Jsdelivr
  2. statically.io


1. How to use jsDelivr


jsDelivr is Open Source CDN its also available on GitHub. To read the documentation about JsDelivr on Github you can visit github.com/jsdelivr/jsdelivr. to use jsDelivr as a CDN for GitHub you have to copy the GitHub repository file link and then paste it in jsDelivr link converter. even if files get deleted or removed jsDelivr will keep files stored in the server.


Select any file you want to use for CDN in Github.

Select any file you want to use for CDN.


After it Click on Right Side Raw Button.


Copy the link/URL and Go to jsdelivr.com/github and paste your link there.


After it, you can Copy the link and you can use it on your website.


2. How to use Statically.io


the same method you use with jsDelivr you can try with statically just go to this link statically.io/convert and paste your copied link to statically.


just Copy the link from Textarea now you can use it anywhere this link.

I hope this information is useful for you.

How to Run All PTC Sites on your Android

How to Run All PTC Sites on your Android


Hello friends, in today's video I will tell you, how you can run any paid to click website on your android smartphone.  For more information you can watch the video below.  It has been explained to you in detail.


What is Silo Structures?

What is Silo Structures?

Hello bloggers, hope you're having a great day. in this article. I'm gonna explain the Silo Structures.

What is Silo Structures?

Silo structuring your website is basically organizing your website. Hence, it is relevant to each piece of content that You're writing. so basically, you've got your categories, and in that category, you only talk about a specific topic.

For example, you can imagine you've got five jars of jelly beans; they've all got different colors, so you'd organize each jelly bean in color in a separate jar. so if you had, you could imagine a jar of jelly beans, and they've All got different colors.

If you have your website and you had all different articles are just thrown onto your website, it's going to look all scattered. it's going to be hard to find relevant content that you're looking for. It's going to be harder to search engines to crawl your site and understand what it's all about. so the better you can structure your site, the more it's going to be easier for your readers to find the content they're looking for.

It's also going to be easier for you to present the content that you want them to see, because if They're searching for a certain topic. Do you want them to only really see that content? That's related to that topic that way you can deliver products or offers to Them, suited for that topic.
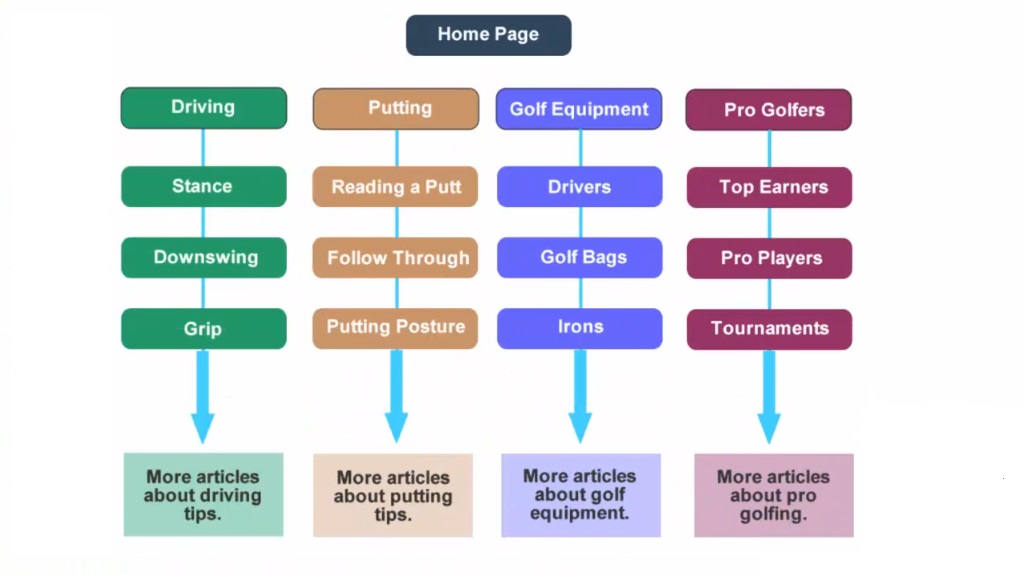
It's just a basic image, and it's trying to use an Example of Golfing.
I'm not much of a golfer, so if you've got a website, you've got the home page, and you know you could have a Static Homepage or a Dynamic Home page.

So the difference between those two Static homepages is one that Doesn't change. It's just Static and Dynamic homepage is maybe. you've got your latest blog post, or maybe you're always updating it, and it's always showing different content so with that homepage. However, you're going to have you're going to want to organize your content into categories, So using this Golfing example, you could Have a category about Driving.

When you're teeing off like a golfer, you could have a category forPutting. That's probably my worst part about golf is trying to learn how to put golf equipmentso you could talk about all the different types of equipment and do reviews and things like that or share your thoughts about ;golf equipment and pro golfers, so you could be talking about the people that are doing really well, in golf you could talk aboutTournaments and pro events and things like that, so as you can see with the diagram in the green section, this is all about Driving so, we're going to write articles that are all about Driving, What you need to know about Driving. And the best thing to do when creating your website is just try and be as helpful as possible.

Doing tutorials, guides, and things like that is a really, really good way of getting You're helping your reader. Because as you know, they're going on online to Search or going onto Google to search for questions and solutions that will find the things that they are trying to find so if you can give them really good advice or help and structure your site, So it's easy for them to digest.

Then the better your conversions are going to be, the better your rankings are probably going to be, and the easier it is for search engines to crawl your website, so what do I do? I'd have a driving category or a category for your first category and then just write content related to that category or that topic and just keep everything all organized within that so With WordPress.

For example, I'll use WordPress because it's one of the most popular you can create a category, and then every time you write a post, you select that category. That post will go into that category, and if someone clicks on the category link, all those posts you chose for that category will display on that page or in that category. So Silo Structure, it's all about relevancy; it's all about keeping things organized and ensuring that your Keyword and your pages are themed towards your keyword, so the green is themed towards Driving.

So I just continue writing more and more articles about driving tips and keep it in that category, so within this, I wouldn't link to putting because putting hasn't got anything to do with driving, and I wouldn't link to any other pages that are not related, so the ideal way is to I mean that you could have this all going up pointing up to your homepage, But I like to.

So, for example, if your Main Keyword is Driving tips called golf. Driving tips, you have that as a category and then interlink to your main category a page where it shows all the driving tips that you're trying to display, or you can do it the other way and try and rank these are for Long Tail Keywords so the Driving tips.

You could have something like the best stance. For Driving, that could be a Long Tail Keyword that could get some searches or the best practices for downswing when driving that could be another one so you'd write these articles and keep them all organized within that category same with padding same with your golf Equipment and saying with your Pro golfers Category. Whatever category that you've chosen.

Now a lot of the time, WordPress sites or any. Other content management systems that you use or the theme you choose will display maybe your latest posts within the sidebar, and the problem with that is it's Going to display all your latest posts.
 
They could have posts pointing to, For example, if you've written an article about Driving or in the sidebar. It could have three articles related to Pro golf or Putting or something like that, and that's just not going to be all that relevant towards the Driving content that you've written or Published now.
 
The way to get out of that is there are plugins that you can use to show only related posts within your sidebar or wherever it displays, so what I would do I would either have a full-width page for each one of my articles and only linking to each one of these articles within the article that way it's super related you are keeping relevancy on the page, and it's thin towards the Keyword.
One of the main ones for WordPress that I use,  it's called Custom Sidebars.
 
Basically, what it does is I can create a custom sidebar for each one of these categories so I can create a slide bar and then only display the latest posts within that category, so what it'll do is if I've got an article about the Best Practices are The Best Stance for Driving well than every other article under that category, I can display that in the sidebar, or I can display it underneath Wherever I want it because it's a widget.
Now the best thing to do is keep like you might have five articles I would write you know really big articles about each one of these so to say three thousand words or depending on what's already Ranking says there's a if you're the keyword that you're trying to rank for.  If you have a look on Google and analyze the top three spots and see how many words they have on each page, well, normally I'd go a little bit more than what they've already got will go really epic and say they've got a 1200 word article I might go in there and write a five thousand word article, but try and keep it as themed as possible towards the keyword that you're trying to rank For, this is pretty much a SILO Structure.
 
Silo Structure is keeping everything organized and making sure it's easy for Search Engine Crawlers to crawl your Website, making sure. That's easy for your visitors to find the content they're looking for, and it just makes sense to keep things organized the way this is set up so if You can do that with your Website.
 
It's going to Create more Relevancy on the Pages that you are writing. It's going to be easier for you to rank, or it's going to show Google or Search Engines the bots and crawlers that that's what This page is all about. I structure it using this method hope you Like this method.